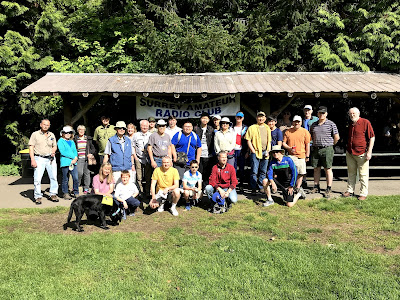
SARC Events


SARC Events


FoxHunt
Video
SARC Courses
Course Information
Field Day
Video

2019-05-31

The June 2019 Communicator

Projects, News, Views and Reviews... 

Here is the June SARC Communicator newsletter: http://bit.ly/SARC19-06.  This month just short of 60 pages of projects, news, views, and reviews from the SW corner of Canada. 

http://bit.ly/SARC19-06

This is the last Communicator of the season. We will be on summer break and will have the next issue for you in September. We always welcome contributions of news, stories and your Amateur Radio experiences. The deadline for the September issue is August 20th.

Have a great Summer, see you in the fall!

73,

John VE7TI
Communicator Editor


2019-05-26

So You Want To Learn CW III


A Communicator Reprise: Part 3


Last month we had the first of three parts of an article on Learning to Send CW. In this post we conclude the series.


Improving Your Fist

Once you have done enough practice with your paddles to be able to be comfortable with them, you will want to set the keyer speed to 15 wpm (if it isn’t there already). The faster rate of characters will force you to recognize characters at the 15 wpm rate. This is the first step to getting your code sending speed up. 

Certainly at the 15 wpm rate you are likely to make many more errors than you have been used to. Don’t slip back, however: continue sending each character at 15 wpm, but allow more time between characters so you are able to focus on making correct single characters only.

As you continue over future sessions you should find that you are able to allow somewhat less space between characters. Continue, for now, allowing extended space between words. 

Gradually, you will find that certain character strings (e.g. “ing”, “the”, etc.) occur repeatedly, and you are able to send the sequence almost as if it were a single unit. This is the time to become concerned about inter-character spacing. I find fldigi to be a very useful tool for decoding CW, and like to use it to help develop correct inter-character spacing. (http://www.w1hkj.com/Fldigi.html) The program is free and has versions available for Windows, Mac OS X and Linux. 

After installing the program, connect an inexpensive microphone to the microphone port on your computer. If your computer doesn’t have a microphone port, but does have a built-in microphone (common with modern laptops) you will have to try to put the speaker from your code practice oscillator near the built-in microphone.

Configure fldigi to take its input from your computer microphone port. Set fldigi in CW mode (under Op Mode on the tool bar) and start sending CW for about 10 seconds. Now look on the waterfall display (bottom of window) and position the marker with the red lines so it spans the line running down the display, which will be at the frequency of your code practice oscillator. Now send some more code and you should start to see some characters in the upper yellow display (the receive window). If any of this is unclear, refer to the program documentation.

If you have things set up correctly, the characters in the yellow display should bear some resemblance to what you intended to send. If in doubt, try sending a series of “V”s with extended spacing. You should see a series of “V”s on the screen. If you have additional noise (garbage characters) showing up, refer to the program documentation to turn on and set a squelch level that permits decoding of only your sending (not background noise).
When you are convinced this is working correctly, start sending from your reference (book, newspaper, etc.). Send with extra inter-character spacing in the beginning. If you are forming your characters correctly, the correct character sequence will appear on the fldigi display. Once you have this working, now move to your usual sending rate but with extra spacing between the words.

Examine the characters showing up on the screen to see if they still match what you intended to send. Likely you will have some which will be incorrect, not because you sent the wrong character, but because you ran two or more characters together. You can experiment with this by sending the word “the” with accentuated inter-character spacing, and then reducing the inter-character spacing. When the spacing is adequate (or too much), there should be a clear “t” “h” and “e”. If the spacing between the “t” and “h”, for example, becomes too small, fldigi will interpret the two as one character and display a “6”. When this occurs you can see your inter-character spacing is inadequate and work on improving it to the point where the “t” and “h” are immediately adjacent, with no intervening spaces, but not run together as a “6”.

Continue, in this way, working on inter-character spacing for each successive word. You want each word to appear as a word with no extra internal spacing, and do not want any two characters to run together.

Once you have your inter-character spacing reliably correct, you can begin to reduce the inter-word spacing, as much as you are comfortable. If you find your words are running together, as shown by fldigi’s display, concentrate on adding just enough additional inter-word spacing until the words reliably appear as separate words on fldigi’s display.
You are now well on your way to developing a clean, understandable fist.


On-Air CW QSOs

When you are able to send code at an average rate of 10 wpm, you are ready for your first on-air CW QSO. This will be much harder than sending from a book, however, which is why you want to reach 10 wpm from a book before starting on-air.

As mentioned earlier, there are four steps in sending CW, and the techniques given to this point address only the last step. It is now time to address the first three steps: 1) What to say (the idea to be conveyed); 2) How to say it (the choice of words and syntax); and 3) How to spell the words. The pressure of a live QSO will make all four steps harder, but in particular, the pressure on you to address the first three steps in “real time” will force you to improve your CW skills the most.

When you begin to practice CW on the air, enlist friends who are at your level, or somewhat beyond, to join you for regular on-air rag-chews. There is no substitute for working together with at least one other person. Ideally, that person will be a non-critical partner who is developing their skills just as you are developing your skills. (Hence the desire of the SARC executive to have an active CW Interest Group.)

As you listen to the CW bands, you will often hear casual “HI, HOW COPY?” type short contacts, which follow a scripted series of exchanges: call signs, signal reports (RST), operator names, QTHs, and transceiver and antennas used at both ends. Then come the local weather reports if both parties wish to continue. After that it’s some variant of “TNX FER FB QSO ES 73” (CW-speak for “thanks for the contact, best wishes”). 

In this kind of contact you can write down the appropriate responses on a cue card and work your way down the list, much like sending from a book. To a large extent, you can even pre-program the responses in a memory keyer (as is commonly done for PSK31 contacts). But not with a rag-chew.

Just as is the case when in casual conversation, in a rag-chew your brain is forced to work on each of the four steps simultaneously. Just as chatting with someone you’ve just met at a party is a test of your conversational skills, rag-chewing is a real test of your CW skills. You are forced to think on the fly, in real time, and hope to avoid sounding like a total fool.  This is a critical step in the process of developing your CW skills.

It doesn’t matter for our purposes whether or not you are a natural rag-chewer. I, for example, would never engage in a rag-chew on SSB, but on CW I’m looking for the practice in the four steps of sending, and particularly the first three. When you are able to rag-chew in CW, freely sending whatever comes in to your head (with, we hope, some judgment applied), and have it come out in crystal clear, perfectly timed CW, you have arrived! (In case you are wondering, I’m no-where near that point yet, but I greatly admire those I hear doing just that a few kHz down the band.)

In your rag-chews, don’t worry if you think you don’t have anything to say. To simplify Step 1, I started by jotting down some notes before the scheduled QSO on the topics I would discuss. If necessary, describe the weather in some detail (but in your own words), or describe what you did since getting up in the morning. Describe the room you are sending from. Describe the clothes you are wearing. Detail what you had for your last meal, and why you chose that. It really doesn’t matter what you send, since you are practising sending, and your partner (one at a time for now; working several in the same QSO is harder and should be left for later) is practising receiving. Don’t send for longer than 60 seconds at a time before you go over to your partner to take a turn. 


Here are some tips for your on-air CW practice

Learn the basic structure, abbreviations, and pro-signs of standard CW QSOs. One basic reference is http://naqcc.info/cw_qsos.html.

As with any on-air activity, before starting make sure the frequency isn’t already in use, first by listening, and then by calling “QRL?”. Wait, still listening, and then about five seconds later (when anyone on frequency has had a chance to respond) again send “QRL? DE Your Call”. If there is still no answer, the frequency is yours.

Try to keep your individual transmissions short so you can develop a conversational style between you and your partner. Ideally you’ll get to the point where one of you will be able to ask the other a question and get a quick-turnaround answer, just as you would on a telephone.

At this stage of your skill development, send “KN” rather than “K” after each transmission, which indicates to other CW ops who might be listening that you don’t want other participants. (This won’t guarantee you don’t get other people calling you, but it will help. And be sure you understand this rule yourself so you don’t butt in uninvited on someone else’s QSO.)

The regulations in Canada require you to send your call sign at the start and end of a QSO, and every half-hour in between. So for short fast interchanges you can use “<BK>”, without signing, to invite your QSO partner to come back, and your partner can do the same with you. Just remember that, if you go beyond 30 minutes, you’ll each need to sign with your call, followed by “KN”. And don’t forget to sign again at the end of the QSO.
Unfortunately, my fingers sometimes keep sending when my brain gets busy trying to think of what to say next (Step 1), and so has stopped feeding them correctly spelled words (Steps 2 & 3). This is about as useful as the random characters that show up on your RTTY receive screen when listening between transmissions, and it can be very confusing to the other party in the QSO. Instead, train your fingers to send “<BT>” (the pro-sign for “ummmm”) when your brain is overloaded.

Sometimes you want your QSO partner to stand by for a short period of time while you “get your act together”. When this happens, send “<AS>”, the pro-sign for “hang tough buddy”. (Just don’t get so wrapped up in something else that you forget to go back to them.)

Sometimes my brain is so busy trying to select words and syntax for the part of the thought I haven’t started sending yet (Steps 2 & 3) that I leave out a few key words (or characters in words) in the part I’m sending. That can be embarrassing if the missing words or characters result in my message conveying a meaning quite different from my intention. Just as, when copying CW, you “copy behind”, when sending you “send behind”. We talk that way also, but after years of practice they seem to happen simultaneously and effortlessly. This is still difficult for me when sending CW, but I believe the solution is to relax and slow down, sending what I have already formulated and then sending a few “<BT>”s until I know what I want to say next.

Sometimes I forget how to spell words longer than five characters (Step 3) because my brain is juggling Steps 1 & 2. Like many of us, I spell by putting a word on paper and then fixing it when I recognize it doesn’t “look right”. Unfortunately, that doesn’t work with CW (although the CW text display on my Elecraft radios helps me see what I’ve just sent, which isn’t always what I planned). One way to address this is to learn the standard CW abbreviations for longer words (like “tomorrow”). This also speeds up the flow of conversation. For example, by the time a QSO-partner has sent “tomo” I can fill in the rest without listening, unless they are about to use the one other word my dictionary shows that starts with those characters, “tomography”, a word which doesn’t turn up often in my QSOs. Better to send just the CW abbreviation “TMW”. Abbreviations are good, if used properly.

In my experience, and that of a friend who is at about the same level of experience as I am, a form of Farnsworth keying, where the characters and words are sent at a higher rate and longer spacing is used between words, is easier to copy for developing CW ops. This is particularly true when you reach the level where you are copying the received code in your head, without pencil and paper.


Becoming Comfortable

With practice and familiarity, you will gradually gain comfort with CW rag-chews, and that will greatly improve your CW sending skills. Originally I would only work people I know. Then I found myself getting calls from people I’d never heard of but who wanted to work me (for whatever reason) while I was trying to contact my first regular on-air partner, Jay VE7KC, for our scheduled daily QSO.

Initially I felt uncomfortable using CW with someone I didn’t know, so I would try to politely explain I’m trying to make a sked with a friend, so couldn’t chat with them at that time. I’d give them a quick signal report and perhaps name exchange, say 73, and go back to calling Jay.

As time went on, occasionally strangers would break into our conversations (despite our use of KN). Often I’d let Jay, or later Deme VE7CRT and Jay, carry on the conversation with the stranger. I’d just sit and listen. But as my comfort with on-air CW has improved, I’m now finding that I am as likely as any of us to reply to the ham trying to break in, and do the initial RST, QTH, name exchange.

As mentioned earlier, there is no substitute for working with a friend when you begin. I started this way with Jay, VE7KC. Looking back in my (paper) log, I find that my first attempted QSO with Jay (when he was VE7OFH) was 6 May 2013. Initially we had a lot of trouble trying to work NVIS between our two physically close locations. My log shows those (initially, many futile) attempts until we learned the tricks of reliable NVIS. I strongly recommend keeping a paper log of your first CW QSOs as a record you can easily browse later.

My log also shows that on 10 January 2014 we added another friend (Deme, VE7CRT) to our regular QSOs. Lately we’ve added another ‘semi-regular’, Walt, VE7BGJ, who is often heard checking into our weekly SARC 2m net. And on occasion, hams we don’t know but who hear the QSO and just want to stop in and say “hi” join us for a visit. It has become fairly common, now, to have a four-way QSO going. 

And as this has developed, the continuing experience has helped both Jay VE7KC and I become much more comfortable letting the words and ideas flow freely from our “fists”. For my part, I no longer have to make notes to get through Step 1. Mostly I can manage Step 2 in real time. And I’m working on Step 3, with the help of strategic abbreviations (and occasional re-wordings!).

Good luck in your journey toward comfortable CW QSOs.

2019-05-23

The Continuing Saga Of The µHam MicroKeyer II


A Communicator Reprise: December 2014


I expect that everyone will remember all the difficulties I was having before FD getting the audio portion of the MK-II working properly with the K3 radio.  In particular, I found the manual to be very unclear and poorly organized. For example there are several references to a station mic (as well as one to a radio mic which turns out to be the station mic) but it isn't clear what constitutes a station mic. I have at least 6 microphones, some dynamic and some electret. Which one is the station mic? I asked the uHam rep (W4TV) to clarify and he said it's the mic the radio came with. Well, I did order mics with the K3s so that answered my question. As things were a little testy I didn't ask the obvious question, "Say I hadn't ordered mics with the radios? What then?"

I have a pretty strong background in documentation so this kind of thing drives me up the wall, especially after having paid some pretty big bux for the two interfaces.

So, the station mic is the K3 mic which is an electret mic (high output level). The actual mic to be used is a Heil HC4 which is a dynamic (low output level).

I followed the instructions (and info from W4TV) as best I could. They start with using the "station mic" plugged directly into the radio to establish the correct mic gain level for the radio. Then the station mic is plugged into the RJ45 connector on the back of the MK_II box and a trim pot is adjusted, to what purpose wasn't clear to me. We weren't going to be using a hand mic so why am I doing this?

Next was to (finally) plug the Heil headset mic into the front panel Ext Mic input and adjust a different trim pot to get the desired ALC level. Hmm... I don't like things plugged into the front panel - I expect to have everything plugged into the rear panel.
IIRC, wasn't able to get sufficient audio to drive the K3 to full output.

One of the things which came out of the discussions with W4TV was that if the "station mic" output was particularly high or the dynamic mic output was particularly low then it might not be possible to drive the K3 to full output. Well, geez. Time to ask for a refund?
So, we didn't use that K3 for FD and I have avoided the issue ever since.

Hmm... contest season is upon us and I want to get this resolved before CQ WW SSB.
OK, it's Wed and contest starts Fri pm. Should be plenty of time to resolve this.
As I've found many times over the years, leaving something alone for some time seems to make things clearer. (Why did I have such a hard time with Physical Chemistry? Looking at the textbook now it seems pretty straightforward. It hasn't helped with my understanding of thermodynamics, though. Might need another lifetime for that - including a stop-over in Hell?)

Two things which dawned on me in the interim were:

1) The setup procedure is based on having a handheld mic, typically electret and possibly with various control buttons, plugged into the back of the MK-II and a headset or boom mic, typically dynamic, plugged into the front.
2) If you're not going to use a hand electret mic there is absolutely no point in using it as a reference as in the "station mic" instructions.

So, I redid everything using my Heil headset with the HC4 dynamic mic for every step in the setup procedure. Still lots of puzzlements due to lack of manual clarity and also a lot of time spent on family matters so didn't actually get on for WW SSB until Sunday.
When I listened to myself talking using the K3 monitor function I was blown away by how clean the audio was. During WW SSB two stations bothered to take the time to comment on how good my signal sounded. That's never happened before.

When transmitting RTTY with MMTTY you see in the spectrum display a signal with a sharp peak which falls away on either side of the peak but has a bunch of uniformly spaced spikes in the part which falls away. I believe these to be distortion products. I note with interest that the magnitude of these spikes is much less with the MK-II sound card than with the on-board card in my computer.

The take-away is that the MK-II documentation is really poor but the hardware is really good. Guess I'll just ask for a refund on the documentation. Just kidding.
Guess I've joined the ranks of the Mk-II believers.

~ Jim VE7FO


2019-05-19

So You Want To Learn CW II


A Communicator Reprise: Part 2


On 2019-04-12 we published an article on learning to copy CW (Morse Code). At that time we committed to following up with another article on learning to send CW.


Like the first article, this one is based on recent personal experience. The methods and tips that have been working for me may not work for everyone, but they will give a committed learner a place to start, with the knowledge that these methods have worked for at least one other person.

The methods described in this article are ones I used to become comfortable in daily CW QSOs with old friends and a few new friends. These “rag chews” normally last from 30-45 minutes and are at a speed of around 18-20 words per minute (wpm).  
This article will not prepare you to participate in CW traffic nets. Nor will it prepare you to work CW contests without using a computer or CW memory keyer to do the sending. But these are things you can grow into, if you choose, after developing the basic sending skills that are addressed in this article.


What You Need to Know Before You Start


Just as you can’t sing “Auld Lang Syne” if you don’t know the tune, it is essential to know the sound of good CW in order to send clear, readable code. 

Practice at copying good code is thus critical preparation for learning to send. If you have not yet learned to recognize well-formed, well-spaced words in CW, put this article aside until you have had more practice listening.

The minimum useful character speed (not necessarily the same as the average text speed) is 10 words per minute (wpm). (This is my opinion—I have read an expert opinion that learners should start at 25 wpm.) Below this the brain hears too much dead space between the dits and dahs and can’t get a sense of the sound pattern. (Although 5 wpm has been used in the US as a minimum code speed, all authorities I have come across have condemned this speed as being so low as to inhibit progression to higher, practical speeds.)

The average code speed can be effectively reduced (for beginners) by adding extra space between successive words (and, for very beginners, between characters, although this slows recognition of standard words and character groups).
Since CW conveys information using only two lengths of sounds, and all the information is in the sequence of these two lengths of sounds and the spacings between the sounds, timing is everything. The only difference between “5” and “SEE” is the spacing between the dits of the “S” and two “E”s.

There are standards for spacing between dits and dahs in a character, between letters in a word, and between words in a phrase. You can find the details at URL: http://www.kent-engineers.com/codespeed.htm, but basically the spacing between the dits and dahs in a character is the length of a dit, the spacing between two characters is the length of a dah, and the spacing between two words is the length of the character “H”.


Getting Ready: Decisions, Decisions


Before you can begin you have several decisions to make.

First, you will have to make a choice of sending apparatus, commonly called a “key”. Actually you have several choices, including the classic straight key (“pump”), the bug, dual paddles and keyer, and the single paddle and keyer. 

I’ve seen a variety of odd-ball sending devices, including the up/down microphone buttons on my IC-7000, the buttons on a recycled two-button mouse, a piece of bent metal and a thumbtack, etc. I strongly recommend purchasing a good quality commercial produced paddle to start, however. You can find some advice at URL: http://www.arrl.org/files/file/Morse/Learning%20Morse%20Effectively-Prior-N7RR.pdf,  but be warned that the highly praised Begali paddles are very expensive. I don’t recommend you start there (unless you want to sell it to me very cheaply if you decide to give up on CW, in which case I hope you buy the Begali Adventure with the mounting bracket for the Elecraft KX3 J). I started with a basic black body Bencher BY-1, and still use that for my base station.

If you choose a straight key, you will be unnecessarily limiting your speed, and a future transition to a paddle will be difficult since the hand and finger action is very different. 
A bug, on the other hand, is an invitation to malformed characters (and I’ve heard some doozies on the air). With a bug, the dahs are sent at manual speed, and the dits are sent at automatic speed. There is not necessarily any correlation between the two speeds, or even between the lengths of successive dahs. 

I recommend using a paddle and keyer. The keyer helps ensure characters are correctly formed.  A keyer used with paddles solves the “bad timing” problem—often heard from bug-users—by generating sequences of correctly timed and spaced dits and dahs. With a keyer, holding the dah paddle too long will generate more dahs, not a long dah (which, in CW-speak, represents the “cut” number for zero), as happens with a bug.

A decision you’ll have to make with the paddles and keyer option is whether you want a single or dual-lever unit. 

With dual paddles you can use Iambic keying. Iambic keying generates alternating dit-dah patterns when the two paddles are pressed at the same time. It requires good thumb-finger coordination and fine muscle control. I am convinced it is more mentally demanding that non-Iambic, since the brain needs to consider the particular pattern of muscle movements required for each character, and getting set up for these movements between characters can be challenging (it is for me when I push my speed up). However, there is a small efficiency advantage in using Iambic keying. 

I use Iambic keying, although I have read that high-speed CW operators commonly prefer single paddle keying, which is necessarily non-Iambic. You can find much more on Iambic keying in an opinion piece, from a negative but useful perspective, at URL: https://cwops.org/wp-content/uploads/2018/06/iambicmyth.pdf.   The explanations are very good, and some of the negative points are good ones. (One particularly pointed argument is the following: “In practice, anybody who can send at 5 wpm with a paddle can “squeeze key” effectively. At 20wpm it takes a lot of practice and some people just can’t do it. Above 40wpm the more complicated squeezes are forgotten about even by operators who “squeeze” everything at slower speeds.”)

In the rest of this article, I will assume you are doing Iambic keying with dual paddles and a keyer. (If you choose not to use Iambic keying, however, I will forgive you: just skip over those bits.)

Once you’ve selected and acquired your new paddles (and I’m going to assume you have selected paddles from here on), you will need to adjust the spacings and tension. You should start with the manufacturer’s recommendations, but you can also find very good information at URL: http://www.morsex.com/misc/keyadj.htm.  However you set things up initially, you will likely be fine tuning those adjustments for some time until you become comfortable with them, so be sure to learn the correct procedure for your unit.
Next you will need something to generate the sounds you need for code practice. You can find suggestions in the article by N7RR referenced earlier, or a “build-it-yourself” design at URL:  http://www.arrl.org/learning-morse-code (bottom link).  I purchased a PicoKeyer Plus at first. You can also get (as I did later) the widely supported K1EL Winkeyer WKUSB-SMT, which, afterwards, can be very useful for getting your rig to send CW from your computer (very useful for CW contesting). Both are easy to build kits for those who like to solder. 

If you have a modern HF rig, this will likely be your least (additional) cost option. Modern HF rigs generally can act as a good code practice oscillator if the QSK (sometimes called VOX) setting is turned off, so the transmitter does not generate a carrier automatically when the key or paddle is pressed. (When setting this up, test it by connecting the transmitter to a dummy load, and turning the power down to the lowest setting available.) Keep in mind, however, that you may not have as much flexibility in Iambic keying options as with the specialty keyers.

A modern specialty keyer can be set in one of at least three common modes: Iambic A, Iambic B, and Ultimatic. With both Iambic A and Iambic B keying, pressing both paddles simultaneously causes the keyer to output a sequence of alternating dits and dahs. The technical differences are described in an authoritative article (by John Curtis, President of Curtis Electro Devices) that can be found at URL: http://users.ox.ac.uk/~malcolm/radio/8044.psIambic A is easier to learn, since, when the paddles are released, the keyer completes the current dit or dah element and then stops.  With Iambic B, if the paddles are released during generation of an element, the keyer will follow whichever element it is currently sending with the alternate (dit or dah) element, so the timing of the paddle action is more critical and must be much more precise (which can be tough for beginners). 

Ultimatic keying is less commonly supported (except by specialty keying chips, such as that from K1EL). With Ultimatic keying the last paddle pressed determines whether the dit or dah is repeated. If the dah paddle is pressed last, for example, the current dit will be completed and then the keyer will generate a recurring series of dahs.

My ICOM IC-7000 supports only Iambic B, so that was how I started and continue today. However, if you have a choice, and choose to use Iambic keying, Iambic A may be easier to learn.

A final decision you will have to make is which hand to use to send. Although I am right handed, I send with my left, which leaves my right hand free to make notes. This is useful when doing fairly fast contacts that are being logged on paper, such as for Summits on the Air (SOTA) activations. It is generally easier, however, to use the dominant hand to send with, since muscle coordination will be better developed and muscle control will be more precise. Whichever choice you make you will likely have to live with, although I know at least one CW op who can send well with either hand.

If you decide to send with your left hand, I suggest you learn, as I did, with the paddle configured for a right-hander, where the left paddle sends dits. The advantage is that you can be a guest op in a right-hander’s shack without having to reconfigure their rig’s paddle settings (a step which is likely to be forgotten and so will confuse one or both of you).


Sending Practice


We’re finally here: you now get to send CW!  You have done your preparations, and obtained, assembled and tested the necessary equipment.

In the beginning you should concentrate on sending one letter at a time, with lots of spacing between letters. Start sending a few standard things, such as your callsign, and those old typing standbys: “The quick brown fox jumps over the lazy dog”, and “Now is the time for all good men to come to the aid of the party”. “My Fair Lady” fans might even try “The rain in Spain falls mainly in the plain.” But these quickly become boring, so you’ll need other material.

I’ve found simple books (hint: this is not the time to pick up that book you were reading on Maxwell’s equations, Laplace transforms, or string theory) and newspaper articles can be useful.

There are four basic steps in sending: 
  1. What to say (the idea to be conveyed);
  2. How to say it (the choice of words and syntax);
  3. How to spell the words; and
  4. How to send the letters in the words. 
Note that the first two steps are common to speech, and so will be familiar. The third step is common to writing and typing, but can be a stumbling block for CW (more on this to come). The fourth step is the one you want to practice first, and using a book as source material will allow you to focus on this step. This step is where you will develop the brain-finger muscle coordination that you’ll need to “talk” in CW, just as, when very young, you learned to coordinate your brain with your tongue, lips, and larynx to speak.
One tip: when sending from books (or other written material), don’t bother with the commas, periods, dashes, and oddities like exclamation marks and quotation marks. You hardly ever need these in real life. 

In real QSOs you can manage very well by abandoning all but a few punctuation marks and pro-signs. Especially useful are the forward stroke used for portable operation (“/“), the question mark (“?”), the pause (<BT>), “73”, the “go ahead” K, the “go ahead only the one station I’m calling” KN, and the “that’s it from me for this QSO” <SK>. 
Finally, you will make mistakes. (If you think you aren’t making mistakes then you aren’t listening closely enough to what you are sending.) 

The formal way of correcting an error is to stop, send a string of eight dits, and then re-start the word in question. In practice the number of dits doesn’t need to be exactly eight, as long as it is clearly more than five (code for the numeral five) and isn’t absurdly large. This is the method I generally use.

Three other methods you might encounter are:
  1. A short series of spaced dits (e.g. dit, space, dit) followed by the corrected word.
  2. A question mark, followed by the corrected word. (Also used to repeat a word where there may have been confusion, such as with an abbreviation such as “SARC”.)
  3. For errors which are obvious (e.g. clear mis-spellings such as “tommorow”), just ignore the error and keep moving, which respects the fact that the operator at the other end can figure out what was intended.
So, with your paddles, keyer, code-practice oscillator set up, and your book in front of you (with adequate lighting), start at Page 1 and work your way through 2-3 pages per session. Keep it up—you are training your brain to make your fingers do the talking.

One final tip: Unless you live alone, you may want to use headphones. (Otherwise in a couple of weeks you may find that you are living alone.)

Keep practicing...


2019-05-14

SARC Fox Hunt


Our Annual Hidden Transmitter Hunt


The annual SARC "Fox Hunt" has long been an established event on our calendar and was recently held on Saturday, May 11th in the now usual location of Crescent Park in South Surrey.  A fox is a hidden transmitter. Fox hunting is a recognized Radiosport, and it has been compared to the ‘Amazing Race’ for Amateur Radio enthusiasts, but instead of getting clues, we use radio direction finding techniques to search for the 5 transmitters hidden somewhere in a large forested park. When one is found, by following a Morse code beacon, we use the identifying paper punch to verify the location. The faster time back to the start with all 5 foxes is the winner. There are annual World ARDF Championships for fox hunting.

SARC members, guests and friends have supported this event and it continues to grow in popularity. This year there were with 27 Hams participating in the actual hunt, along  with 5 unlicensed 'friends'. It was also encouraging that we had several young people participating.


It was a dry and sunny day, participants were divided up into teams of "Expert"  and "Novice" class. Where there were not enough receivers, participants "buddy-up" to share equipment.  After a brief intro  and training session by Amel VA7KBA and Jeremy VE7TMY, and with adrenaline flowing, the  groups were enthusiastically dispatched in 10 minute intervals.  Much fun was had by all .

With the popularity of 80m, we did away with the 2m foxes and five 80m foxes were hidden throughout the park. Participants were allocated 90 minutes to find them. 


The social half of the event was the informal BBQ, providing an opportunity to engage in  stories, an exchange of lessons learned  and challenges overcome. Warm camaraderie prevailed over burgers and hot dogs. 


In any planned event such as this, there are many moving parts and I extend recognition and greatest of thanks to Amel VA7KBA, Jan Voslenik VA7VJ, John Schouten VE7TI who  handled  all the set up and the technical aspects of the "foxes".  Much  appreciation  to Brenda (XYL of Anton VE7SSD) for food shopping, John Brodie VA7XB for ice and the BBQ and the able chefs, Stan VA7NF, Nell VE7PE and  Pam VE7PFH for expertly staffing the grill.  Special mention is made of Les Tocko VA7OM, who, through a conflict in schedule, was unable to attend. His support throughout the year is acknowledged.


The results:

Expert class 


1st place: Jan Vozenilek VA7VJ 5 foxes 44 mins 
2nd place: Henry Dahl VE7HRY 5 foxes 50.5 mins


Novice class  


1st place: Jeremy Morse VE7TMY 5 foxes 78:50 mins  
2nd place: Ken Patenaude (unlicensed)  5 foxes  80:20 mins 
3rd place: Paula Struthers VE7PSP  5 foxes 80:45 mins 


An informal “prize” ceremony, bragging rights and the 'crystal fox' trophy were awarded to the winner, Jan Vozenilek  VA7VJ.  The stuffed musical bunny was awarded to Jeremy Morse VE7TMY.   

Mark your calendars (tentatively) for the same weekend next year, Saturday May 16th, 2020, as we look forward to another annual SARC FoxHunt.


A video of the event is available for viewing at:
 http://bit.ly/FoxHunt2019

More photos


~ Fox-Hunt co-ordinator :
  Anton James  VE7SSD


2019-05-09

The Contest Contender


A Communicator Reprise: November 2014

For beginners… A look at the basics


While we have an active Contest Group at SARC, there are some within our membership who may not have been exposed to this activity. It is probably one of the most realistic scenarios for emergency operations training and a skill that any operator who has an interest in emergency preparedness should experience.

Contesting (also known as radiosport) is a competitive activity pursued by amateur radio operators. In a contest, an amateur radio station, which may be operated by an individual or a team, seeks to contact as many other amateur radio stations as possible in a given period of time and exchange information. Rules for each competition define the amateur radio bands, the mode of communication that may be used, and the kind of information that must be exchanged. The contacts made during the contest contribute to a score by which stations are ranked. Contest sponsors publish the results in magazines and on web sites.

Contesting grew out of other amateur radio activities in the 1920s and 1930s. As trans-oceanic communications with amateur radio became more common, competitions were formed to challenge stations to make as many contacts as possible with amateur radio stations in other countries. Contests were also formed to provide opportunities for amateur radio operators to practice their message handling skills, used for routine or emergency communications across long distances. Over time, the number and variety of radio contests has increased, and many amateur radio operators today pursue the sport as their primary amateur radio activity.

There is no international authority or governance organization for this sport. Each competition is sponsored separately and has its own set of rules.

Contesting Basics

Radio contests are principally sponsored by amateur radio societies, radio clubs, or radio enthusiast magazines. These organizations publish the rules for the event, collect the operational logs from all stations that operate in the event, cross-check the logs to generate a score for each station, and then publish the results in a magazine, in a society journal, or on a web site. Because the competitions are between stations licensed in the Amateur Radio Service (with the exception of certain contests which sponsor awards for shortwave listeners), which prohibits the use of radio frequencies for pecuniary interests, there are no professional radio contests or professional contesters, and any awards granted by the contest sponsors are typically limited to paper certificates, plaques, or trophies.

During a radio contest, each station attempts to establish two-way contact with other licensed amateur radio stations and exchange information specific to that contest. The information exchanged could include a signal report, a name, the U.S. state or Canadian province in which the station is located, the geographic zone in which the station is located, the Maidenhead grid locator in which the station is located, the age of the operator, or an incremental serial number. For each contact, the radio operator must correctly receive the call sign of the other station, as well as the information in the "exchange", and record this data, along with the time of the contact and the band or frequency that was used to make the contact, in a log.

A contest score is computed based on a formula defined for that contest. A typical formula assigns some number of points for each contact, and a "multiplier" based on some aspect of the exchanged information. The rules for most contests held on the VHF amateur radio bands in North America assign a new multiplier for each new Maidenhead grid locator in the log, rewarding the competitors that make contacts with other stations in the most locations. Many HF contests reward stations with a new multiplier for contacts with stations in each country - often based on the "entities" listed on the DXCC country list maintained by the American Radio Relay League ("ARRL"). Depending on the rules for a particular contest, each multiplier may count once on each radio band or only once during the contest, regardless of the radio band on which the multiplier was first earned. The points earned for each contact can be a fixed amount per contact, or can vary based on a geographical relationship such as whether or not the communications crossed a continental or political boundary. Some contests, such as the Stew Perry Top Band Distance Challenge, award points that are scaled to the distance separating the two stations. Most contests held in Europe on the VHF and microwave bands award 1 point per kilometer of distance between the stations making each contact.
After they are received by the contest sponsor, logs are checked for accuracy. Points can be deducted or credit or multipliers lost if there are errors in the log data for a given contact. Depending on the scoring formula used, the resulting scores of any particular contest can be either a small number of points or in the millions of points. Most contests offer multiple entry categories, and declare winners in each category. Some contests also declare regional winners for specific geographic subdivisions, such as continents, countries, U.S. states, or Canadian provinces.

The most common entry category is the single operator category and variations thereof, in which only one individual operates a radio station for the entire duration of the contest. Subdivisions of the single operator category are often made based on the highest power output levels used during the contest, such as a QRP category for single operator stations using no more than five watts output power, or a High Power category that allows stations to transmit with as much output power as their license permits. Multi-operator categories allow for teams of individuals to operate from a single station, and may either allow for a single radio transmitter or several to be in use simultaneously on different amateur radio bands. Many contests also offer team or club competitions in which the scores of multiple radio stations are combined and ranked.

If the foregoing has raised your interest in contesting and you would like to experience a contest first-hand, several members are willing to open their stations for you to give it a try. Contact a member of the Club Executive or send an email to communicator@ve7sar.net

~ John VE7TI


2019-05-05

A Tale Of Two Hams


Radio Ramblings

This story appeared in the May Communicator [page 22] https://tinyurl.com/SARC19-5 and has had a positive response ao it is re-puplished here.

My wife Laura (VE7LPM) and I live in an old house on Smith Avenue in Burnaby.  In fact, I have lived there most of my life.  I came to the house in the summer of 1981 as a renter, and over the next few years was able to convince the owner to sell me the property.  It was expensive for a young police officer, but has turned out to be a good investment.  That aside, the place is centrally located near Boundary and Kingsway, and Laura and I have found it so convenient to practically everywhere that we have never thought too much about moving.  We respected the old place and have tried to keep it up.  

Over the years the house supported all my amateur radio activities, my two towers, and a not insignificant antenna farm.  I participated in contests, deployed dozens of odd antennas, made my first satellite QSO from the back deck, completed DXCC, worked my first EME contacts, and even (literally) blew up my 2 kilowatt 2-metre linear there in 1989.  Ka-boom!

The house was built in 1925, and despite its age, it’s in pretty good shape.  See Figure 1.  I had some time in the past couple of months, so thought that I would do some investigative work to find out something of the history of our home as it approaches the end of its first century.  

What I found is the subject of this month’s column.


Figure 1 – Our House Today

House Genealogy

All we knew about our house was that it was built in 1922  and that it had had a few owners before I moved in in 1981.  A retired police colleague had done research on his own house in Victoria, and suggested that a good starting point for finding out more is the “City Directory”.  

City Directories were published annually and date from a simpler time where residents were not worried about financial scams or identity theft, and when privacy was not a significant social issue.  Directory representatives would visit all homes in the Lower Mainland (and the province) annually and gather details of residents, owners, and occupations of those living in the community.  The information was published in a thick large-format book indexed by streets and surnames.  Directories for all of BC going back to 1860 are now available online courtesy of the Vancouver Public Library (VPL)  .

I used the VPL site to research our house based first upon its address.  Strangely, I could find records of our home going back to the early 1960s, but for earlier years our address did not show up in the City Directories.  This was odd!

I had to try a different approach.  Each City Directory also indicates street and cross-street, so by looking at the combination of “Smith Avenue” and looking for cross street names, I learned that sometime in the late 1950s the block numbers in Burnaby were all “reset” to match the block numbers used in the City of Vancouver.  I confirmed this renumbering by referring to historical street maps .  I could not find our house prior to about 1960 because the house number had been changed!

Armed with the new block number (the 3800-block rather than the current 5400-block), I was then able to track our home and its owners/residents back to 1925.  Prior to 1925, there were no records.  This too seemed odd.  I discovered through inquiries at Burnaby City Hall that our home had been built not in 1922, as Laura and I had always thought, but rather, in 1925.  This was our first interesting discovery.  City Directory searches confirmed that a new house and new residents showed up at 3854 Smith Avenue in 1926.

By googling our old street address, I was amazed to discover that City of Vancouver Archives  had a photograph of our house in 1931 .  See Figure 2.  I deduced through some online research in the Vancouver Archives and some corresponding VPL information that our home had been photographed as part of an advertising program for a 1930s-era furnace company.  Somehow the photos had been preserved.  Very interesting!


Figure 2 – Our House on July 21, 1931

Back to the City Directories, I was able to track the owners and residents of our house from 1926.  Armed with resident names, I was able to cross-reference from the street index to the directory’s name-based entries and find out about occupations and businesses that the residents had been involved in.  

This was interesting and I was able to build a chronology of owners and residents.  Laura and I are the sixth family to live here.  I googled the past residents, their occupations and businesses and discovered that prior to 1946 the house had been owned by a fellow who was involved in the auto business; and next by a large family who also owned another house on the block.  One of their daughters attended UBC.

I learned that in 1946 the house had been sold to a fellow named Edward James Fowler.  Naturally, I thought I’d do a bit of research on Mr. Fowler as I had on the other owners of our home.  See Figure 3.


Figure 3 – City Directory for 1946, “F. Fowler” 


Serendipity


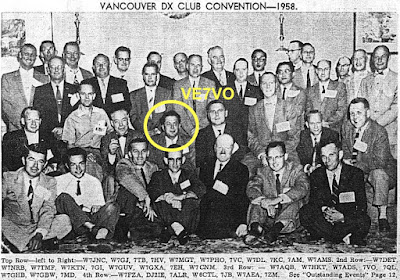
Googling “E.J. Fowler” and our old address, I discovered that Edward James Fowler was known as “Ted”, and that he was, in fact, VE7VO.  Ted Fowler was a very well-known personality in the local amateur radio community.  He had been in Vancouver since at least the late 1930s .  

A prolific contester and DXer with several awards, he had been written of in QST and “Shortwave Magazine”, another popular radio magazine of the 1930s and 1940s.  This was very interesting!  

See Figure 4 for a photo I found in the BC DX Club Archives of VE7VO and colleagues at the 1958 DX Convention in Vancouver .


Figure 4 - DX Convention, Vancouver 1958

Spurred to do further research, I next discovered that all of the old Radio Amateur Callbooks from the 1920s onwards  have been scanned and made available by the Internet Archive  – an excellent site for information on radio and television history and on old radio technology.  

I downloaded several callbooks from the late 1940s and 1950s and looked up VE7VO.  See Figure 5 for VE7VO’s entry in the Fall 1947 callbook.  Note his address is that of our house at (then) 3854 Smith Avenue, shown as “New Westminster” rather than in Burnaby.


Figure 5 – VE7VO in the Fall 1947 Radio Amateur’s Callbook

I thought next that I would track VE7VO backwards from his purchase of our house in 1946.  I learned two more interesting things.  First, the VE7 call district did not exist prior to 1939.  This was news to me!  By searching for “Fowler” in the 1939 Callbook  I learned that VE7VO was in fact VE5VO at that time, but that he was already in Vancouver, as shown in Figure 6.

Figure 6 – VE7VO was VE5VO prior to WW II

The second thing I learned is that Mr. Fowler was a commercial pilot, as I am.  Unlike me, however, he had military flying experience.  I decided to follow this lead.

VE5VO had served with distinction in the Royal Air Force in Britain during the war.  As a pilot he flew several missions over Europe, and then after cessation of the war had been part of the RAF’s mission to disarm the German Luftwaffe.  “Shortwave Magazine” included a story in April 1946 about how Flight Lieutenant Fowler, VE5VO was instrumental in restarting amateur radio in Europe post-war .  He was issued the callsign D2VO.  See Figures 7 and 8.


Figure 7 – Shortwave Magazine, April 1946

Figure 8 – D2VO in Summer 1946 Radio Amateur’s Callbook


Post-war, Mr. Fowler was listed in the City Directory as a pilot and technician for TCA: Trans Canada Airlines, the forerunner of Air Canada.  However, I determined that he had changed careers by the 1950s and was involved in technical management of commercial radio transmitters .  He moved to Surrey in the early 1960s and passed away in 1983.  He was survived by a son, but there is no record of his son having an amateur radio license .


Other Interesting Observations

VE7VO lived in our house for about fifteen years, until about 1960.  He was active in amateur radio at that time.  I started thinking about whether I could find evidence of where his shack was, or perhaps where his antennas had been located.

When I moved into the house in the summer of 1981, I noted that one of the basement window frames had a number of strange large holes drilled in a linear fashion in its bottom frame.  I plugged the holes to keep mice and insects out, and eventually the window itself got replaced.  Now I am thinking that these holes were likely the ingress points for feedlines.  I had had evidence of “hamming” right before my eyes but had missed it!

A few years ago, Laura and I were doing yard work, as couples do.  She was digging up a rough patch in the backyard to smooth it out, and unearthed a large turnbuckle.  It was about a foot long and encased in rust.  She showed me the turnbuckle and I remember thinking “hmmm, when it was new that would’ve been great for securing a tower guy line”.  I didn’t recall losing a turnbuckle for my own towers, which were up at the time, but never really thought more of it.  The turnbuckle got tossed into our metal recycling.  Perhaps this was a leftover from one of VE7VO’s antennas.

The only other further evidence I have of antennas or antenna supports is weak, but I will present it here as it highlights another valuable resource for people doing historical amateur radio research.  Many cities have begun to make archival aerial photos available to the public.  These photos are integrated with modern GIS (Geographical Information Systems) and typically made available online.  Burnaby is no exception.  

I visited the City’s “Burnaby Historical Aerial Photo Viewer”, which contains zoomable orthophotos of Burnaby going back to 1930 .  Heading back in time to 1930, I was able to look at our house and the neighbourhood and watch it develop over the subsequent decades.  In particular, I noted that my then-state-of-the-art “TH6” Yagi antenna was clearly visible in photos from the 1980s to the early 2000s.  See Figure 9a and 9b.  As an aside, note how the quality of these photos has improved due to advances in technology.  

Maybe I could use historical orthophotos to find evidence of an antenna or tower!


Figure 9a – VE7ZD’s (VE7CPT’s) TH6 Yagi in 1985
Figure 9b – VE7ZD’s (VE7CPT’s) TH6 Yagi in 2004


I turned next to orthophotos from the VE7VO period, 1946 to approximately 1960.  While I could not find obvious evidence of an antenna, I did note, however, the presence of an odd structure in the backyard of the house that cast a long shadow relative to other elements in the picture.  The photo is quite grainy, but you can make things out.  See Figure 10.


Figure 10 – House and Possible Antenna Support Structure in 1950

A tower or antenna support pole?  I will likely never know, but the structure’s location and characteristics do not look like a fountain, table, or other common garden element.  There is no evidence of the structure in our backyard today.

Interestingly, the structure was within about two metres of where I placed my own tower base in late 1981 after I moved into the house.  If the structure in the 1950 orthophoto was a tower or antenna support, it shows that hams even across time think alike!

Conclusion

This was an interesting journey into amateur radio history, and the history of one radio amateur, and his residence in the period from 1946 through about 1960.  I found out a lot about the history of our home, and located a fantastic 1931 photo of our house, showing it to be in essentially the same condition as it was nearly ninety years ago.  

It was amazing to think that another ham, and such a prominent one, had lived in the same house as Laura and I, and that VE7VO and I have both enjoyed the challenges and thrills of amateur radio from this location.  I wonder if we chose the same room for our shack?

An ongoing project for me is to try and find an old QSL card from VE7VO, or even VE5VO .  QSLs usually give the op’s address and often list station details and other information which would be of great interest to me.  It would be really neat if VE7VO’s QSL included a photo of his QTH, or of his shack!

One final point.  In the late 1970s and early 1980s, I was extremely active on the bands, and was a member of a couple of local radio clubs, including the “Fraser Valley DX Club”, FVDXC.  We met in Surrey and Langley on a monthly basis.  I do not recall ever meeting Ted Fowler, VE7VO, but it is possible that, as a prominent DXer (then with decades of experience) and a then-Surrey resident, that he might have been a member of the FVDXC as well.  If he was, then I wish I had met him, and that the fact that serendipity had led me to live in his old home had come to light.  We would have had a lot in common, and meeting him would have been a really interesting experience!

That’s it for this month!  Feedback can be directed to the Editor, or directly to me at mcquiggi@sfu.ca.  Have a great month and 73,

~ Kevin VE7ZD / K7MCQ


Follow Kevin's "Radio Ramblings" monthly column in The Communicator

This article first appeared in the May 2019 SARC Communicator newsletter https://ve7sar.blogspot.com/2019/05/the-may-2019-communicator.html 


CQ CQ CQ

The Operation Market Garden Special Event Station

Commemorating 80 years  An important stage in the liberation of Western Europe Operation Market Garden was an Allied military operation duri...

The Most Viewed...