Radio Ramblings...
Synopsis
The Hardrock-50 (see Figure 1) is a US-designed, 5W-in to 50W-out HF amplifier that operates on the 160 through 6m amateur bands. It includes automatic band switching, does not require tuning, and integrates seamlessly with popular rigs such as the Elecraft KX3 or Yaesu FT-817 series. An optional QSK board and automatic antenna tuner are available. The amplifier runs on 13.8 VDC and draws under 10 amps at full output.
The HR-50 is provided as a well-documented kit and can be assembled in about ten hours. It aligns easily using common test equipment and performs well. My own kit easily out-performed the amplifier’s design specs. Price is US$299 from Hobby PCB in Florida at https://hobbypcb.com.
Background
Having recently returned to amateur radio, I was interested in the new digital modes, and especially the new digital HF mode FT8. My new Elecraft KX3 performed very well on the mode, and I was able to achieve WAS (Worked All States) in about three weeks using the radio’s maximum recommended digital output of 5 watts into my 23-metre longwire antenna.
That said, working DX using FT8 while QRP was quite difficult, and although I worked a small number of foreign stations, I found that it took quite a bit of effort to be heard among the other stations who were using higher power and better antennas than I have. I had no problem hearing considerable DX; the problem was that they usually did not hear me. Something had to be done!
I started researching linear amplifiers with an output of 50 to 100 watts, thinking that being able to boost my signal at the antenna would likely make me more competitive and allow me to work much of the interesting DX that I had been hearing.
I learned that 100-watt class amplifiers were either low quality and affordable, or of high quality, but more expensive than my limited budget would allow. Reviews of some of the cheap amplifiers showed them to generate high amounts of distortion and even spurious illegal emissions. Not something that I would allow in my station!
Additionally, I doubted the necessity of running 100 watts on FT8 (my main communication interest) as the mode performs so well on very weak signals that more than 10-30 watts is hardly ever required to work global DX. 50 watts would give me enough “edge” to work a lot of DX.
My extensive research led me to a US-designed amplifier kit called the “Hardrock-50”, from a small firm called “Hobby PCB”1 in the eastern US. The amplifier covers 160 through 10 metres with an output of approximately 50 watts for 5 watts input, and about 40 watts output on 6 metres.
The prototype for the Hardrock-50 was a winner in a design contest sponsored by the ARRL in 2010. The much-evolved production version, now called the HR-50, is FCC “type accepted” and meets all legal requirements for amateur band operation.
Reviews of the HR-50 were excellent, and the documentation on the Hobby PCB website showed that the assembly and operation manuals were complete and well-designed, and reminiscent of the classic “Heathkit” manuals of the 1950s-1990s. It looked like a good solution to my needs.
Purchase
At US$299, the price for the kit met my budget, so in late January I “took the plunge” and ordered the amplifier kit. I ordered the optional full break-in (QSK) board as a US$30 option, but decided against the internal automatic antenna tuner (a US$179 option) as I already own a nice external auto-tuner from LDG. I planned to use that with the new amplifier.
The kit arrived in a few days. The parts were all of good quality, and the kit was organized into sub-packs of parts for each main component of the assembly process (front panel; back panel; main PCB, et cetera).
Assembly
I downloaded the HR-50 assembly manual to my iPad and followed it step-by-step. The manual is well-written and clear. There are three PCBs provided: for the front panel, the back panel, and the larger main PCB. My kit contained a fourth PCB for the optional QSK board. All the PCBs come pre-populated with the key surface mount components such as the microprocessors which control the amplifier. The PCBs are manufactured off-shore but quality is good. No SMD soldering is required.
Assembly starts with the front panel and works through the back panel, the main PCB, and lastly, the QSK board for those customers who have purchased this option. Assembly consists of inserting and soldering through-hole devices such as the four MOSFET power transistors, band switching relays, connectors, and headers and short jumper cables which link the amplifier’s boards together.
The optional QSK board is installed above the main PCB through provided headers and nylon spacers. Hardware is of excellent quality (stainless steel) and everything fit together perfectly.
Assembly was straightforward and I encountered only a few issues with the assembly steps. For example, in one step in assembly of the main PCB, I failed to read the step to the very end, and unfortunately installed two 2-pin terminal blocks which were NOT required if one is installing the QSK board. I had to de-solder the two terminal blocks as they would mechanically interfere with the QSK board to be installed above. A minor inconvenience, and technically my error, as I should have read the step to the very end!
An amplifier is an analog device, so the main PCB contains about 15 toroidal inductors which are part of the different ham band filters. The ~1.5 cm cores and a generous supply of enameled wire are provided. Alternatively, a full set of pre-wound toroids is available as a kit option for US$30.
I chose to wind my own toroids for the experience, as I had never wound smaller toroids such as these. The directions in the manual were clear and photographs of what the finished toroids should look like are included in the assembly manual, so I decided to do the winding myself. I thought that it would be a great opportunity to learn a new skill. See Figure 2 below.
Amplifier filter “Q” (and consequently, amplifier performance) is improved by taking care to wind quality toroids, so it is worth the time to complete these assembly steps properly. The turns need to be tightly wound and spaced evenly. Critical is proper counting of the turns through each core. The toroid winding steps took me about two hours.
The hardest part of winding the toroids is removal of the insulation from the wire ends. This can be accomplished either by scraping (Exacto knife or Dremel tool) or via application of heat from a soldering iron. I used a combination of the soldering iron method and scraping with an Exacto knife. This took a couple of hours, but I got it done. After building the kit, I discovered a great tool for stripping enameled wire3. It’s designed for this purpose and works really well. I ordered one for US$14 on Amazon and would definitely recommend using one, as it makes stripping the enameled wire quick and easy!
Three small transformers must also be wound using supplied wire, but these were straightforward once I had completed the big toroid winding job.
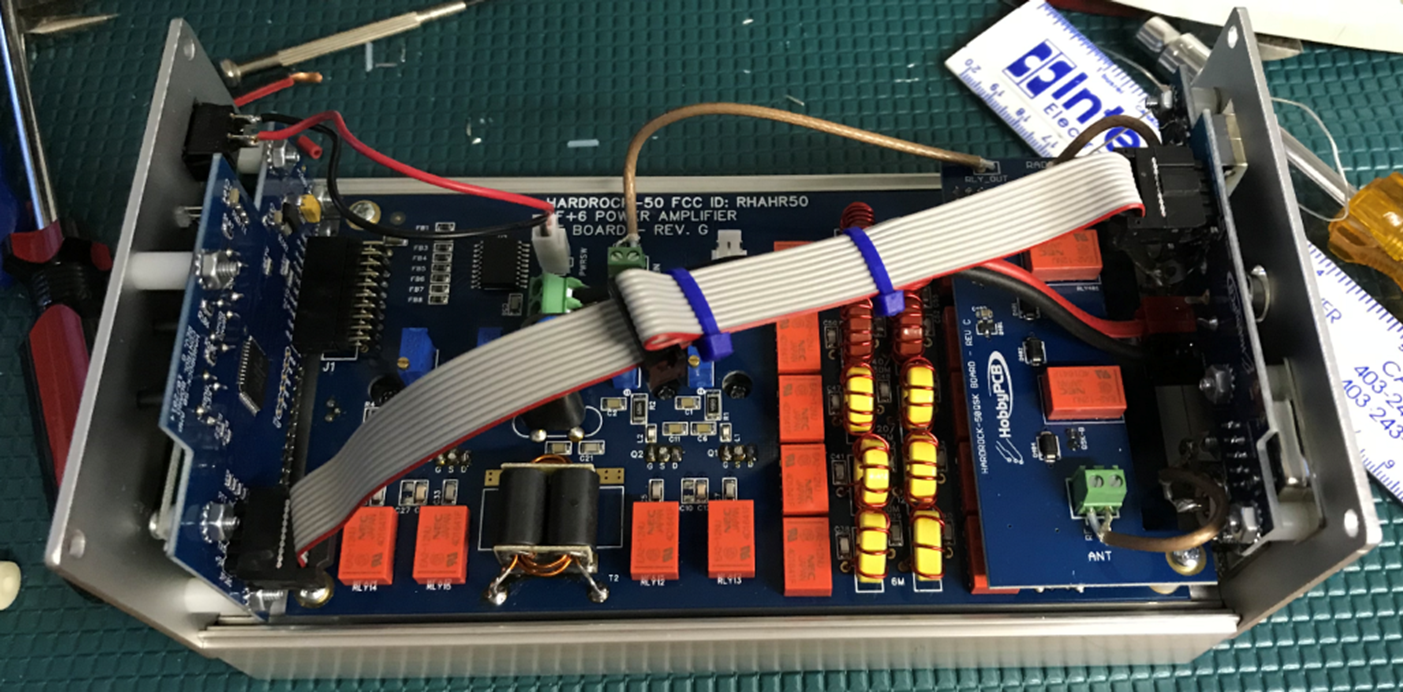
The kit includes a large extruded aluminum heatsink to dissipate heat from the four power MOSFETs. This serves also as the chassis for the entire amplifier. The main PCB is secured to the heatsink, and the front and back panels are bolted to the ends of the heatsink. The four MOSFETs and a helpful temperature sensor are also mechanically attached to the heatsink. The provided aluminum cover then integrates everything into a nice-looking device, as can be seen in the attached photos of my amplifier.
After about ten hours of (fun) work over three days, my amplifier was complete and ready for alignment and testing. See Figure 3 below.
Alignment
Alignment of the HR-50 requires a 13.8 VDC power supply capable of about 10 amps, a small screwdriver and an ammeter such as available on common DMMs. The process consists of setting zero-drive bias current on the four MOSFETs.
This was a straightforward process and my new amplifier tuned up easily and quickly.
Testing
Next came the moment of truth! I connected the amplifier RF input to my KX3, and the amplifier output to a good quality dummy load. For the automatic control signals, I connected my KX3’s control output signals and serial port to the amplifier through a small KX3 interface board that I bought from Hobby PCB as a US$30 option.
I could have made my own (simple) control cable but chose the easy route in this case! Cable pinouts are provided in the assembly manual for those who want to “roll their own” interface cable.
Three settings on the KX3 had to be changed to set the inter-device baud rate and route PTT to the HR-50. Similarly, three settings had to be set on the HR-50s control menus. Then, I was ready to go!
“First Light”
First, I wanted to confirm that the HR-50 was receiving band change information from my KX3. I reduced my KX3’s output power to 0 watts and cycled up and down through the amateur bands on my KX3. The HR-50 received the band change data and nicely tracked band changes.
Next came a test of amplifier performance. I keyed the transmitter (still into the dummy load) and increased power to 0.5 watts. The HR-50 was working! I cycled through the bands and noted that power output was working well. On some bands, for example, I could easily exceed 50 watts output with only 2 to 3 watts of drive. I was suitably impressed!
On other bands, notably 20 and 80 metres, however, I noted that the HR-50’s output was strangely low. What could be the cause?
Human Error
I’m as human as the next guy, and this section describes how I resolved this odd “low power on some bands” anomaly.
I investigated the low power situation, particularly on 20 metres, for a few days without resolution. I suspected that perhaps I had made an error in winding one of the toroids. I emailed Hobby PCB with a few questions and was honestly surprised when I got an email back from the amplifier’s inventor, Jim Veatch (WA2EUJ) within an hour.
Jim was very supportive and gave me some suggestions for testing. He reminded me early that “Hobby PCB guarantees a working amplifier for every customer”, and that if we could not resolve the problem, that I could simply ship my HR-50 to him and that he would personally find the problem and fix it himself. Impressive customer service!
I did some troubleshooting using Jim’s suggestions, and the HR-50 seemed to be “normal” in all respects. Very odd; I pondered this overnight.
The next morning, I decided to go “back to basics” and troubleshoot from the KX3 outward. I put a wattmeter on the KX3’s output – something that I had not done before as I was relying on the rig’s internal (more accurate) digital wattmeter.
I noted that on 20 and 80 metres (the bands with the lowest HR-50 output) that even if I set my KX3 to read 5 watts on its internal wattmeter, that my external meter only read about 1 watt output. How could this be? The rig was almost new. Had I “blown the finals”, as we used to say in the old tube-based rig days?
Then, a glance at the KX3’s display caused something to “twig”: the KX3’s internal ATU was still on! The KX3 had previously been used with my non-resonant-on-20-and-80 longwire antenna and still assumed that it was feeding that antenna, not the amplifier. The rig was now connected to the (resonant) HR-50. Eureka!
I disabled the KX3’s ATU, and the external wattmeter now showed 5 watts output on each band. The HR-50’s output into the dummy load jumped to what it should be, 50 watts+ on 160 through 10, and 40 – 50 watts on 6 metres. I was in business! See Figure 4 below.
Performance
I hit the bands with my longwire and noted vastly improved reception of my signal by both NA and DX stations. The option to run up to 50 watts is great and has allowed me to make many more contacts that I could with 3 (maximum 5) watts digital on my “barefoot” KX3.
Now, about three weeks in, the HR-50 continues to perform perfectly. The front panel user interface is easy to use, and the amplifier tracks band changes automatically.
Also appreciated is the fact that the amplifier is unaffected by high SWR at the antenna connector. An open circuit, or even a dead short at the antenna terminal will not damage the MOSFETs. Of course, I have not made either of these errors, but it is nice to know that the finals cannot be “blown”, like in the “olden days”!
The heatsink gets quite hot using digital modes like FT8 with its 50-percent duty cycle, and heatsink temperature can reach 50 to 60 degrees Celsius. However, these heatsink temperatures are within the amplifier’s “normal” range, and the HR-50 operating manual says that external cooling should only be considered if the heatsink temperature goes above 90 degrees C. This is unlikely, in my experience.
The QSK board in the amplifier also works well and provides silent and extremely fast T/R switching, including “inter-dit” reception when using CW.
Conclusion
For my station and operating profile, the Hardrock-50 was a great investment. The kit is professionally designed and well documented, the amplifier works as specified, and it is backed by excellent support. Assembly was straightforward and fun, and I learned something about winding toroids. I will also not forget to turn off my KX3’s ATU when I return from portable to base operation!
I am extremely happy with the HR-50 kit and would highly recommend it to anyone running QRP and looking for a moderate boost in output power.
That’s it for this review. Please feel free to send comments and questions to me at mcquiggi@sfu.ca.
~ Kevin VE7ZD/K7MCQ
19-03