
Mobile installations can be complicated, whether it is for a complex rover rig setup or just a relatively simple two meter FM installation. Here are some lessons that I have learned in that area over the years.
Getting power to the rig:
Connect directly to the battery. This provides a degree of filtration against alternator whine and ignition noise. A direct connection allows you to use your gear without turning the ignition on, though you must take care to turn the radios off or you will end up with a dead battery. Some rigs have an auto-off function that solves this problem.
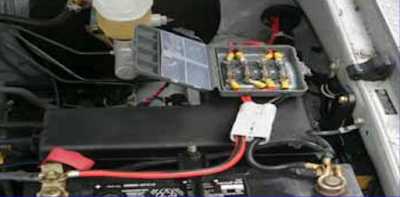 |
| This is the fuse box installation in my 2005 Toyota Tundra. The box is a small fishing tackle box with some partitions removed. It is affixed to the air filter housing with Superlock® fasteners. The large PowerPole® connectors enable me to unhook the power in an emergency. Note that this container even provides for the storage of spare fuses. |
Cigarette lighter circuits are light duty and are usually unsatisfactory for radio installations. If you must use one you should reduce power on the rig to limit the current draw. There are several power distribution panels on the market, and nearly all of them use Anderson PowerPole® connectors. They make a much better distribution system than a cigarette lighter socket.
 |
| Power panel - This is one of two power panels in the Tundra. The other one is located on the transmission tunnel just forward of the passenger seat. Each will handle 30 amps and has a main fuse plus individual circuit fuses. These panels are available from the nice folks at http://www.dcpwr.com. |
Routing cables:
Getting cable through a firewall can be a hassle, but it can done. Most vehicles have holes in the firewall that are sealed with plastic or rubber plugs. Once you have determined that you can get to both sides of the plug, pull it out and punch an appropriate size hole through it using a gasket punch. Use a hole that provides a snug fit to the cable. Inexpensive gasket punches are available at Harbor Freight, item 6770-9VGA. This gives you a clean hole for your cable and will prevent the grommet from splitting. Once the cable is in place, seal around the cable opening with RTV or silicone caulk. This will reduce drafts, engine noise and the possibility of carbon monoxide entering the cabin. When running cables inside the engine compartment, be sure to avoid hot exhaust component and moving parts such as the steering linkage. Likewise, if you are routing cables under the dashboard make sure that they do not rub against or interfere with moving parts such as heater control cables, brake cables, etc. Installing cables inside the vehicle can require some effort.
You can usually lift trim panels on the door sills by removing screws. If you are lucky, there will be a cable trough under the panel. An electrician’s snake can be handy for pulling wires, especially under carpet or between the headliner and roof. If you route cables under carpet do not route under heavy wear areas.
Where to put the rig:
The placement of the transceiver is critical. It should be ina convenient location for operation and should not interfere with vehicle controls. Many mobile rigs have remote control heads which makes installation a lot easier. The only downside to remote heads is that the speaker is in the main body of the radio and it may be hard to hear. This problem is solved by installing a small mobile speaker. If possible,place the rig and control head where it cannot be readily seen from outside the vehicle. This will reduce the chances of theft.
 |
| Mounting the control head – Here’s a view of the control head for my IC-706MKIIG mounted on the dash of the Tundra. I was able to snake the remote cable under the dashboard and out through a gap by the windshield. The mounting bracket is bolted to an aluminum mount that is affixed to the dashboard with Velcro. The Velcro on the top of the control head is to affix a sun shield. This shield is necessary to keep the unit from overheating in direct sunlight. It extends over the defroster vents and directs cold air to the control head. |
I prefer to have the microphone cord routed so it comes from behind me and has tension on the cord when I am using it. This allows me to drop the microphone without it getting tangled in the controls. I learned this lesson the hard way when I wrapped a mike cable around the steering wheel and ended up in the ditch! Securing the microphone can be a distraction when driving, so you might wish to use self-adhesive Velcro rather than the catches that come with the gear. I like to put the scratchy side of the Velcro on the dashboard or console so I can feel it with the backs of my fingers when I am stowing the microphone. I also use Velcro to secure brackets for control head mounts. Radio Shack sells Superlock Fasteners that are a lot like Velcro, but much heavier and stronger. It is not cheap, but it allows you to mount gear without drilling holes in the car if you have a clean flat surface.
Mounting an antenna:
Antenna mounts can be tricky, especially with newer cars. If you are willing to punch a hole in a fender or the roof, use a Greenlee punch or a metal-cutting hole saw. This gives you a nice clean hole that is easier to weatherproof. If you own a pickup, consider the GeoTools pickup stake hole mounts.
Their web page is at: http://www.geotool.com/antmount.htm. I’ve used two of them on my 2005 Toyota Tundra. They are beautifully made and it is easy to make a clean installation with them. You should take care when routing antenna cables. They also must be kept away from moving parts, exhaust parts and sharp edges. Consult your auto dealer to determine the location of on-board computers and give them a wide berth for fear of interfering with vehicle electronics.
Do yourself a favor and tag your antenna lines at the radio end. This is especially important if you have more than one antenna. If the antenna connections on the rig are not easily accessible, you might consider running a piece of coax to a more easily accessible location and installing an antenna splitter switch there. This will enable you to switch to a portable antenna should the need ever arise.
The next step is to check the continuity between major body parts such as the roof, fenders, trunk lid and hood. If you do not have continuity between these parts it will affect the antenna ground plane and reduce ignition noise shielding. Fortunately, it is usually easy to bond these components with
small pieces of ground braid.
Once everything is in place, check the SWR and make appropriate adjustments. An antenna analyzer is the ideal tool for this, but you can also use a SWR bridge that registers in the appropriate frequency range.
Find the original article at https://goo.gl/3vE9RR in the March 2011 Communicator


No comments:
Post a Comment
Sorry, but due to spam, only SARC member accounts may comment.
Note: Only a member of this blog may post a comment.