
A Communicator Reprise: September 2012
Phase 2 - The Foundation
Last month I described my efforts to factor in the various constraints at my QTH around location and installation of a self-supporting tower, and then to begin digging the foundation hole. Persistent effort with the shovel and jackhammer gradually got the job done over a period of 3 weeks, with the hole ultimately reaching the design depth of 6 ½ ft deep. Soil from the last 2 ft had to be loosened, shoveled into buckets and lifted out by rope. I was lucky to encounter no significant amount of water or large boulders, just stones and stiff clay, the latter of which turned mushy if allowed to get wet after loosening and before removal. The result was a hole of desired dimensions with vertical, competent sides and no need for formwork below grade. I actually made the hole 60 in x 63 in wide, which is larger than the 4.5 ft x 4.5 ft called for in the spec.
 Next I purchased re-bar in 20 ft lengths and constructed the reinforcing cage later to be lowered into the hole. This proved to be a challenge as rebar does not easily bend and moreover, it tends to bend where you don’t want it. After some experimentation and initially poor results, I made a bending jig that allowed all the critical pieces to be fabricated to identical size and shape. Bending was done with a 2 ft piece of steel pipe inserted over the rebar, held in place in a vice or in the jig. I then assembled the various pieces of rebar into the final configuration by first driving the 8 vertical elements a short distance into the ground to temporarily hold them upright, then tie-wrapping the horizontal elements one-by-one to the vertical elements from the ground upwards. I left off the top elements initially to limit the weight while the cage was lowered into the hole, then added them later once the cage was in place. The contraption was rather wobbly until surrounded by concrete.
 After completing the rebar cage by adding the final horizontal elements in situ, a head frame of the required size was fabricated from 2x6 and 2x10 lumber, positioned over the hole and the rebar cage and shimmed level. Some finishing details were added to the frame to give the final product a beveled edge. I then made up a temporary 2x4 support for the steel tower base which I had purchased from the manufacturer, US Towers. Prior to this I had acquired three 27 inch long bolts of correct ASTM specs from a local supplier, Trydor in Surrey (half the price of ordering from US Towers). The assembly was placed on the frame in readiness for concrete to be poured. I had also acquired three copper-plated steel ground rods which were hung from the outside edge of the frame to be embedded into the edges of the concrete.
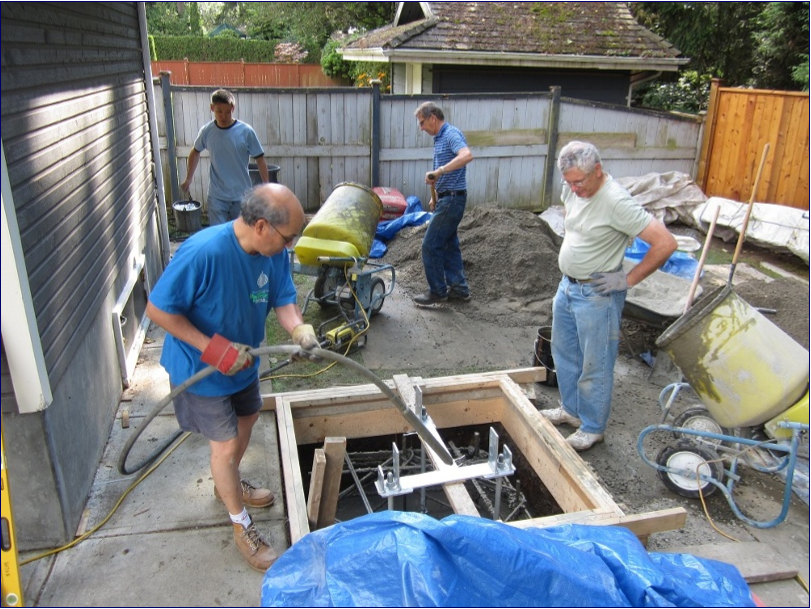 We set up two rented mixers next to the hole with the Navvy Jack, cement and water close by. I also rented a concrete vibrator which was lowered into the mix periodically during the pour and used to remove entrained air and distribute the concrete around the rebar and anchor bolts. Starting at 0730 on a warm Thursday morning, the crew continued mixing and pouring until the job was done around 1300. The top was leveled with a screed, then left for an hour or two to partially set before finishing the surface. The forms were removed the next day and the concrete kept moist for several days thereafter during the hot weather to improve curing.
  This tower is hinged at the base and can be raised and lowered with a special fixture and hand winch, making erection a relatively simple matter. Shortly, I plan to temporarily connect the tower to the base, raise it to a vertical position then adjust the leveling nuts below the base to ensure the tower will be absolutely plumb. Once I am satisfied with this, I will remove the tower and fill in the space beneath the base with thin-set mortar. The tower will again be attached to the base and raised. Our next installment will describe these steps.
~John Brodie VA7XB


No comments:
Post a Comment
Sorry, but due to spam, only SARC member accounts may comment.
Note: Only a member of this blog may post a comment.